Friday, July 29, 2011

Dating at Home: Chocolate Tasting!

8:00 AM 0 Comments
This week's dating at home idea...

Chocolate Tasting!

This is going to be a delicious date! What's better than being with your spouse and chocolate?

Today I'm going to Trader Joe's and a few other places to pick up some assorted chocolates. I'd really like to try some new chocolates rather than Hershey's and Dove (which I LOVE Dove!)

I made a Chocolate Tasting Ratings Chart. It's extremely simple and you can download it HERE if you wish to use it. Fill it in with your findings. You can either write a description in the boxes or fill it in with your ratings, on a scale of 1-10. I haven't decided how I want to rate my chocolate yet. ;)

I didn't know that chocolate tasting was so complex! Check out this chocolate tasting wheel from Chocopolis. (I chose this wheel because I thought it was the prettiest. No joke.)


For more information about chocolate tasting, check out these two sites that I liked.

Chocolate Tasting 101


Enjoy your date!

I know I will.

Wednesday, July 27, 2011

Making Family Dinners Fun

11:41 AM 0 Comments
This week...

DELIGHTFUL DINING: More moon pebbles, please!

Use silly names for the foods you eat. Corn isn't "corn" but rather "moon pebbles." Spaghetti is "monkey brains," and salad is "the chewsen one." Make up funny and even some gross names. Kids will love naming and eating their "exotic" foods.


TABLE TOPICS: Never A Dull Moment
  • If you could re-name your family members, what would you name them? What name would you choose for yourself?
  • What should we do more of as a family?
  • If you could go somewhere with just mom (or just dad), where would you go?

FLAVORFUL FAVORITES: Brooke's MoROCKIN' Chicken

Moroccan Chicken


Ingredients:

1 medium onion, coarsely chopped (1/2 cup)

8 oz. baby carrots

1/2 cup pitted dried plums (prunes)

1 14 oz. can reduced sodium chicken broth

8 bone-in chicken thighs, skinned

1 1/4 tsp. curry powder

1/2 tsp. salt

1/2 tsp. cinnamon


Directions:

  1. In a 4-5 quart slow cooker combine onions and carrots. Add plums and broth. Top with chicken. In a small bowl combine curry powder, salt and cinnamon. Sprinkle over chicken.
  2. Cover and cook on low-heat setting for 8-10 hours or on high setting for 4-5 hours. Remove chicken and vegetables from cooker with a slotted spoon. Spoon some of the cooking juices on each serving.

I served this over rice. It was delicious.


Click HERE for a printable version of this recipe.

Tuesday, July 26, 2011

Easy Chocolate Banana "Ice Cream"

10:57 AM 0 Comments
What do you do with the over ripe bananas at your house? Toss them in a smoothie? Make banana bread (great recipe to come)? Throw them away?

Here's another option: Make Ice Cream!


I would prefer making homemade ice cream with my bananas but it takes forever! This recipe is easy and done in minutes.

What you're going to do:

Freeze a couple over ripe bananas. When they're frozen, put them in a blender with some milk (or cream) and some chocolate syrup. Blend it up. DONE!

Much "healthier" than regular ice cream and it still tastes good!

My 3-year old thought she was eating real ice cream. She loved it!

Coffee Filter Snack Bowls

10:33 AM 0 Comments
At church on Sundays I get to be in the nursery where all the little kids (ages 18 months to 3 years) play while their parents have a chance to learn. During that time we play, sing, have a little lesson, and have a snack.

Instead of using napkins or paper plates or bowls for snack time, we use coffee filters. It's like a little bowl for each child and they're super cheap. The kids love it!

I've decided to use them for play dates too. They're just easy. MJ loves them too. I think it makes snack time a little more fun. Switching up the norm.


Pirate's Booty, sliced grape tomatoes, sliced baby carrots


Veggie Straws, cut string cheese, sliced apples


Monday, July 25, 2011

Chocolate Bowls: My 2 Cents

5:10 AM 16 Comments
So, you've seen those cute, fancy chocolate bowls made with the balloons? I tried it. They turned out okay. A couple suggestions:

*Don't use water balloons. They stuck to the chocolate after popping them. (Yes, I used cooking spray before dipping the balloons in chocolate) Use thicker balloons, but still small enough for a cute bowl.
*Make sure you wash the balloons and let them air dry- as most instructions suggest. Don't skip this step.
*Make sure your chocolate isn't the slightest bit warm or else the balloon will pop.
* I would melt a bag of chocolate chips with a bag of Reese's Peanut Butter Chips. THAT would make one heck of a delicious bowl.
*I would also decorate the bowl after it is dry for extra cuteness. Pipe a little icing on the bowl with cute polka dots or something fun.


If you don't have a ton of time, these are also quick and easy and fun. Just paint chocolate onto the side of cupcake liners and put them in the freezer to harden. Once they are done, just peel the paper off and voila! You're done! The paper comes of so easy! (Just work quickly so the chocolate doesn't melt in your hand.) Next time I would use the LARGE cupcake liners. These are standard. These would work great if you are filling them with smaller portions.


Thursday, July 21, 2011

Family Dinners

4:57 AM 0 Comments
DELIGHTFUL DINING: Table Reading

Choose a book of interest to kids of varied ages or maybe a book that a child is required to read for school. Read for just 10 minutes as children are finishing eating. Pick up where you left off tomorrow night.


TABLE TOPICS:
  • If you could re-do your own bedroom (or house) what would it MUST have?
  • Name a time in your life that made you feel proud about yourself.
  • Name one thing that you would still like to do this summer.

FLAVORFUL FAVORITES: Heidi's Potato Dinner Rolls

You can half this recipe and it still makes plenty!

Ingredients:

3 c. milk
1/2 butter (1 stick)
1/4 c. crisco
1 c. potato flakes (or instant potatoes)
3/4 c. sugar
1 Tbsp. salt
1-1/2 Tbsp. yeast
1/3 c. water
pinch sugar
4 eggs
8 c. flour
1/4 c. butter, softened
extra flour to flour surface

Directions:

  1. Heat 3 cups milk in microwave for 5 minutes on high
  2. Add 1 stick butter, 1/4 c. crisco, 1 c. potato flakes or instant potatoes, 3/4 c. sugar and 1 tablespoon salt. Beat until lukewarm.
  3. In the meantime, soften 1-1/2 tablespoons yeast in 1/3 cup lukewarm water with a pinch of sugar.
  4. Beat 4 eggs, then add milk mixture, yeast and 4 cups flour and beat until smooth. Add 4 more cups of flour one at a time. (Makes a soft dough) Mix for a few minutes. I just mix it in my Kitchen Aid mixer. Cover and let rise for 1 hour.
  5. Take out half of the dough and roll out in large rectangle. Spread 1/4 c. of softened butter over dough. Fold in thirds. Fold long side bottom of rectangle up and then the long side of rectangle top down over it. Starting from end cut small slices off and twist into a tie or knot folding ends under. When pan is full, cover with plastic wrap and let rise 2 hours. Repeat for other half of dough. Bake at 375 degrees for 11 minutes.

**This makes a huge batch. However these freeze really well so you could freeze them too. Don't worry if the dough seems too sticky. That's how it is. Just plop it out on a floured surface and lightly flour and it rolls out and works just fine. I think that is what makes it so good.


Click HERE for a printable version.

Wednesday, July 20, 2011

Eat Cake

4:08 AM 0 Comments

It was my husband's birthday last week. He requested this cake. (This was the last piece.) I have made it once before and now it's one of our favorites. It's a white cake made with buttermilk and layered with old-fashioned chocolate frosting.

It's so good that I'm sharing the recipe!

White Cake

Ingredients:
4 egg whites at room temperature

2 c. flour

1-1/2 cups sugar

2 tsp. baking powder

1/2 tsp. salt

1/4 tsp. baking soda

1 cup buttermilk

1/2 cup shortening

2 tsp. vanilla


Directions:

Let egg whites stand at room temperature for 30 minutes. Preheat oven to 350 degrees. Grease and flour pan. In large mixing bowl combine flour, sugar, bakingg powder, salt and soda. Add buttermilk, shortening and vanilla. Beat on low until combined. Then beat on medium speed for 2 minutes. Add egg whites on low until combined and then beat again for 2 more minutes on medium speed. Spread in pans. Bake 25 minutes or so until done. Watch and check to see when done. Cupcakes will take about 15 minutes, depending on your oven. Cool and frost.


Old-Fashioned Chocolate Frosting

This recipe is from Our Best Bites. Click HERE for this AMAZING recipe.

NOTE: I do not have a paddle attachment to my Kitchen Aid stand mixer but a whisk attachment works just as well. If you notice that the frosting isn't whipping up very well, put the bowl back into the ice bath until the frosting is cooler. The recipe says to let the bowl stay in the ice bath for 1-2 minutes. I suggest at least 5 minutes or so, stirring constantly. Make sure you scrape the bottom and sides of your bowl before whipping the frosting. Sometimes the chocolate begins to harden in the ice bath- it's okay as long as you scrape it off the sides and bottom before whipping.

ENJOY!!!


Tuesday, July 19, 2011

Make Your Own Butter

5:38 AM 2 Comments

What do you do with that leftover heavy cream in your refrigerator? Make butter!

It's easy, quick, and fun!

You will need:
Heavy cream
A smallish jar (baby food jar, jam jar, etc.)
Salt

1. For best results, make sure your cream and jar are cold. I put my jar in the freezer for 5 minutes.


2. Fill your jar about half-way full.


3. Start shaking! Shake your jar vigorously. Take turns with your child. (The smaller the jar, the quicker it takes to make your butter.) The picture below is what it looks like after 2 minutes.

4. Keep shaking. At 3 minutes it feels like nothing is moving inside but it's working. Below is what it looks like at 3 1/2 minutes.


5. Keep shaking. Here is what it looks like at 4 minutes. You can see the separation of butter and liquid.


6. Shake a little bit longer. Here's what we had at 4 1/2 minutes!


7. Drain the liquid and stir in a little salt. YOU'RE DONE! Try it! You'll be surprised! It's delicious! And you made it!

Monday, July 18, 2011

Dessert for Family Night

9:43 AM 0 Comments

Yes, I forgot one of my favorite parts of Family Night... DESSERT!

These Oatmeal Peanut Butter Sandwich Cookies are my new favorite PB cookies. Simply amazing!! Moist, nice texture, and SO GOOD!


You can find the recipe HERE on Let's Dish!- a new favorite blog of mine (you can see why). The blog has better pics of these cookies. These were the last two cookies that survived over night at my house.


Tonight is Family Night

4:45 AM 0 Comments

picture taken from villageknight.com

Tonight for Family Night we are hitting up Barnes and Noble bookstore. We love books! We love to visit the library or any kind of bookstore. For date nights, my husband and I love going to the bookstore before a movie, when we have a little time to kill. We flip through the travel magazines to see the clear aqua ocean water of the Caribbean and remember our past life without children. Tonight MJ and Peanut will be joining us. We won't be flipping through our magazines but we will be reading plenty of children's books. It will be fun.

I'm extremely grateful that MJ loves books. I hope that Peanut grows to love books just as much as MJ does.

One of MJ's favorite books is The Sneetches and Other Stories by Dr. Seuss. If you don't have this book, I highly recommend obtaining a copy for your family. This is a book full of social issues and lessons. It is a great spring board for teaching. Her two favorite stories in this book are The Sneetches and The Zax. They happen to be my favorite too. For MJ at this stage of her life, at three years old, The Sneetches teaches about being nice to everyone- no matter who they are or aren't. The Zax teaches about the downfall of being stubborn but I don't think she quite understands that yet. This will be an important lesson for her as she grows older.


I have purchased the same stories on DVD for MJ. We love watching them. They have great songs. Oh yeah, and it has Green Eggs and Ham. Who doesn't love that one?


Friday, July 15, 2011

Dating At Home

11:05 AM 0 Comments
You and your spouse will have fun with this date night idea tonight...or sometime when ice cream is on sale:

Sculpt whole blocks of ice cream. Add toppings to make it more detailed and make sure the ice cream is well frozen. Get an off brand so it's not soft of smooth. It's messy and sticky but tasty and fun.

This is a perfect idea for warm summer nights.

Family Dinners

11:02 AM 0 Comments

Click HERE to find out why I put an emphasis on family dinner.

DELIGHTFUL DINING: Two Truths and One Lie

Each family member reports on three things about his or her day. Two of those things are true and the other is a lie. The others try to guess which thing is the lie. Kids love to see the reaction of their parents and see if they can stump them too.

TABLE TOPICS:
  • What is your favorite chore to do in the house? Your least favorite?
  • What is your favorite toy? Why? Where did you get it?
  • What is the silliest face you can make?

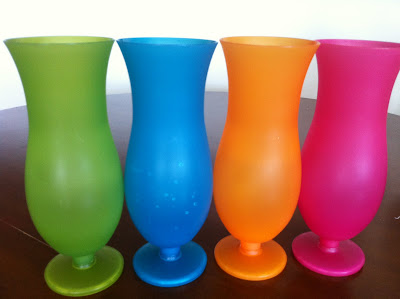
EXTRA FLAIR: The Michael's craft store near our house is moving locations which means they have everything for 70% off. MJ found these fun plastic cups. She said she wanted to have "fancy" cups for dinner. I forked out a whopping 60 cents for each. These will be fun for dinnertime this week.


Tuesday, July 12, 2011

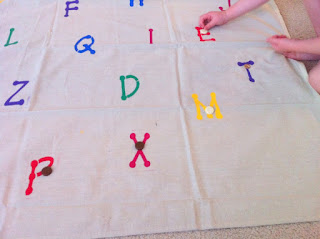
Alphabet Stomp Mat

4:37 AM 0 Comments
I was at an educational store a couple weeks ago and saw this cute alphabet game. I thought, "that would be fun for MJ!"
How much did they want me to pay for it? $36.95!! For that piece of plastic? No thank you! So, I made my own version, a sturdy one that won't rip, for about 11 bucks.

Supplies:

One painter's drop cloth ($7.50)
Set of fabric paints ($5.00 with 40% off coupon from JoAnn making it $3.00)
Stencil set (On clearance from $8.99 to 59 cents! at JoAnn Fabrics.)
Paint brush (had a cheap sponge brush at home. You could use a regular clean sponge too.)

1. Cut drop cloth down to the size you want it. (I cut my drop cloth into thirds. I used only one third for this mat. Now I have extra cloth for other ideas that I have. :) TIP: Once you cut your cloth, the cut edges WILL fray and sometimes they fray terribly. To avoid the problem, either hem the cut edge or tape the edge with simple masking tape. If you look closely at mine, you will see my tape. I have plans to sew mine but I just got too excited to paint it.

2. Position all the stencils on the drop cloth and put a small piece of tape on the stencils to hold them in place.

3. Sponge the paint on.


4. Let the paint dry a little before lifting the stencils off. Allow the paint to dry for 24 hours just to ensure that it's completely dry before playing.


I haven't ironed my mat yet but I love it!!!! It's nice and sturdy and MJ can stomp on it and play on it!


We've already played some fun games:
  • MJ stomps from letter to letter to spell her name or other simple words.
  • I will shout out a letter and see if she can stomp on the correct letter for letter recognition.
  • Cover up the letters with old game board pieces.
  • Use a bean bag to toss onto the letters
  • Fun practice for spelling lists for older kids.
  • Grab a set of alphabet flashcards and match the letters on the mat.


The great part about making things on your own is that you can make it how you want it. You can change the stencil style, or put cute pictures on it, etc. I would love to decorate the edges a bit.

Friday, July 8, 2011

Kid's Caprese Salad (and Easy Mommy Version)

6:19 AM 0 Comments
MJ is 3 years old and doesn't like any kind of green salad. However, she will eat tomatoes and cheese. I've come up with an easy kid's caprese salad that MJ loves. VICTORY! I WIN!


Kid's Caprese Salad

9 Grape Tomatoes, halved or quartered
1 Stick of String Cheese, cut in coin-like pieces
salt and pepper to taste

Toss together.


I made a "mommy" version of this salad by adding some balsamic vinegar, a tiny bit of olive oil, and some fresh basil (if I have it lying around). YUM!


DIY: Instant paper books

5:52 AM 2 Comments
My three-year old is very artistic. She loves to color, paint, cut, draw, etc. She is also very imaginative. We created our own little paper books to illustrate. Here's an easy way to turn a piece of paper into a little book.

I used a large piece of construction paper here. You can use a regular piece of printer paper, or get fancy with some scrapbook paper.


1. Fold the paper into eighths.


2. Fold your paper back in half "hamburger" style. On the folded seam, cut between the two "squares." Cut only one square deep. I used a marker so you can see where to cut.


3. Open your paper up again. You should have a cut in the middle of your paper.


4. Fold your paper in half again, "hot dog" style.


From the top view, it should look like this- folded seams on top.


5. Grab the ends of the paper and push them toward the middle so it looks like this:


6. Fold the pages together so they look like a little book. Tada!


Here's another version with a lot of little pages.

Here's my construction paper again.


1. Fold the paper into 4x4 "squares"


2. Cut 3 squares deep on the top and the bottom rows, cutting in the same direction. On the middle row, cut 3 squares deep going in the OPPOSITE direction. Check out the dashed lines I marked.


Cut


3. Beginning at the top corner, start folding back and forth.


4. When you get to the end of the row, fold DOWN one square and continue folding back and forth with the second row.


5. You should end up with a cute little book that looks like this.


We had a great time illustrating our books and "reading" them to each other.

When I was a high school Spanish teacher, we made these little paper books as study aids for my students. We wrote down all the Spanish verb tenses and their conjugations along with when to use the verbs, blah, blah, blah... Anyway, my point is, that they are good study aids for your older kiddos. :)

Endless possibilities.

Follow us @justonemomtrying

Instagram

Follow Us